Mild chili con carne has rich, comforting tastes and is perfect for people who don’t like spicy food. This tasty recipe will show you how to make a reasonable chili that is good for the whole family.
This mild chili con carne is a standard comfort food that is easy to make and even easier to enjoy. It goes well with rice, cornbread, or tortilla chips. This article, will explain how to make mild chilli con carne.
Ingredients
- 1 massive onion
- 1 chili pepper
- 2 garlic bulbs
- 1 tablespoon of oil
- 1 teaspoon of spicy chili powder (or 1 tablespoon if you only have mild)
- 1 teaspoon of paprika
- 1 gram of powdered cumin
- 500g of lean ground sirlo
- 1 beef bouillon cube
- 400g tin of diced tomatoes
- 0.5 grams of dried marjoram
- 1 tsp sugar (or, as an alternative, a thumbnail-sized piece of dark chocolate; see tip)
- 2 tablespoons tomato puree
- 410 grams of canned red kidney beans
For Serving
- Rice or corn tortilla bits
- Grated cheddar or Monterey Jack cheese.
- Acidic moisturizer
- Freshly chopped cilantro
- Jalapeno slices (optional)
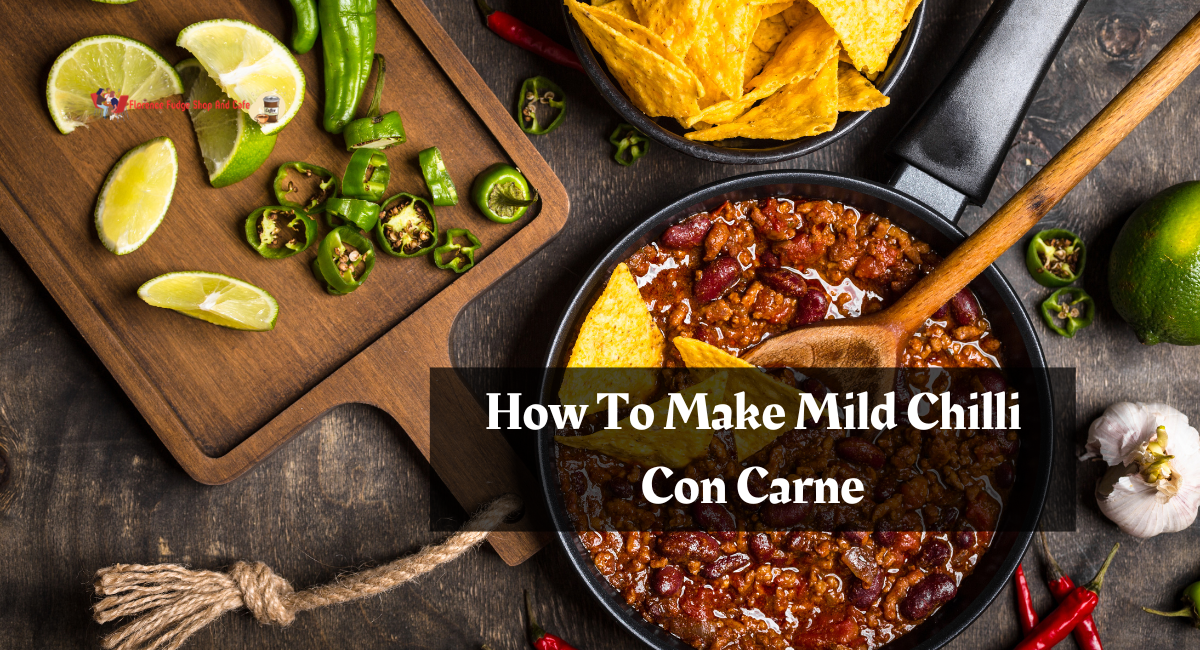
How To Make Mild Chilli Con Carne
Method
1. Saute The Aromatic
- Before adding 1 tablespoon of olive oil, heat it over medium heat in a big skillet or saucepan. Let the oil warm up first.
- Add one onion that has been finely chopped to a heated skillet. About three to five minutes, or until translucent and aromatic, sauté the onions.
- Add 2 minced cloves of garlic to the skillet. Sauté the garlic for an additional minute, rotating frequently to prevent it from burning. The aroma of sautéed onions and garlic will permeate your kitchen and form a flavorful base for your chili.
2. Browning The Beef
- Add 450g of minced beef to the sautéed onions and garlic in the skillet. While the meat is cooking, break it into smaller segments with a spatula.
- Keep cooking the beef for another 5 to 7 minutes, or until it no longer has a pink color. Using a spoon, you can get rid of any extra oil that builds up in the pan as the beef cooks.
- After the beef has been browned, remove any excess fat. This measure helps reduce the total amount of fat in the chili.
3. Season With Spices
- Now is the moment to season your chili with tasty ingredients. Combine 1 teaspoon ground cumin, 1 teaspoon powdered coriander, 1 teaspoon paprika, 1/2 teaspoon oregano, 1/2 teaspoon salt (to taste), and 1/4 teaspoon black pepper in a skillet with the cooked meat.
- Stir the spices into the beef mixture and simmer for two minutes longer. This enables the spices to lightly toast and release their flavors, enhancing the chili’s overall flavor.
4. Vegetables And Tomatoes
- Chop one red bell pepper and combine it with the cooked beef and seasonings in a skillet. Stir to integrate ingredients.
- Drain and sanitize a 14-ounce (400g) can of kidney beans before adding them to the pan.
- Pour in a 14 oz (400 g) can of diced tomatoes (along with their juices) and add 2 teaspoons of tomato paste for a flavorful taste.
- Mix everything well to ensure that all the ingredients are equitably distributed.
5. Simmer
- Reduce the heat to a low setting to preserve a simmer.
- Cover the pan or saucepan and allow the chili con carne to simmer for 20 to 25 minutes. This simmering period enables the flavors to meld, and the chili will thicken naturally as it cooks.
- To prevent adhering or burning at the bottom of the skillet, stir occasionally.
6. Adjust Seasoning
- Chili con carne should be tasted and seasoned as necessary.
- You may add more salt, black pepper, or other seasonings to your liking.
7. Serve
- Serve your chili con carne moderate in bowls.
- Top each dish with shredded cheese, a dollop of sour cream, chopped fresh cilantro, or chopped green onions for more flavor and freshness.
Tips
Here are some additional tips for preparing the finest mild chili con carne:
- Adjust the Heat: You can reduce or omit the chile powder if you prefer a milder chili. You can also substitute sweet paprika for conventional paprika to reduce heat without sacrificing flavor.
- Use Lean Meat: Using lean ground beef or ground poultry will result in a healthier chili with less fat. If using meat with a higher fat content, be careful to drain excess fat after browning.
- Beans of Your Choice: This recipe asks for kidney beans, but you can substitute pinto or black beans instead. For added variation, a combination of legumes might be used.
- Let It Simmer: The longer you simmer the chili, the more its flavors will combine. Consider simmering it for up to an hour, if you have the time, for maximal flavor.
- Spice It Up Gradually: If you need more certainty about the desired level of spiciness, it’s best to start with less chili powder and add more as required. Once a dish is too spicy, reducing the amount of seasoning added isn’t easy.
- Toppings: Chili is frequently accompanied by a variety of garnishes. You can add sliced onions, green onions, avocado slices, and even a squeeze of fresh lime juice in addition to the specified garnishes.
- Make It Ahead: Typically, chili tastes even better the next day as the flavors have had more time to combine. Consider preparing it the day before and reheating it before serving.
- Freeze for Later: Chili can be frozen for future consumption. You can prepare a larger quantity and freeze it in portions for future fast and easy meals.
- Serve with Sides: For a complete meal, consider serving your mild chili con carne with cornbread, tortillas, or a basic green salad.
- Experiment: Feel free to experiment with various ingredients to create your chili. Add diced carrots, maize, or even cocoa powder to add flavor depth.
Mild chili con carne is a crowd-pleaser that blends soft ground beef, aromatic herbs, and substantial beans to provide a tasty and comfortable dinner. You may experience the powerful flavor of chili without the severe spice by following this simple recipe, making it a diverse option for many palates. You’ll have a supper fit for any occasion with the addition of your chosen garnishes.
Thanks for reading.